

Fun Kids Crafts With Chalk You Can Make at Home
A box of chalk can do a lot more than cover the sidewalk. With water, cornstarch, dark paper, and a few basic supplies, it turns into floating prints, homemade paint, and bright ocean art.
Here I will show you a few fun and easy ways to use up all that chalk this summer. Some are indoor fun on paper and others take the activities outdoors.
Check out the video below to see how to make all these fun crafts:
Why chalk works so well for easy kids’ art
One reason chalk works so well for at-home art is that it changes depending on how you use it. On its own, it draws soft lines. Shaved over water, it makes swirling prints. Crushed and mixed with cornstarch, it becomes a simple paint. Smudged across dark paper, it creates a under the sea craft.
The best part is all of these crafts are simple for beginner crafts. They also can be made more complicated for older kids.
Large chalk sticks work well, and smaller leftover pieces work too. Rainbow colors are especially useful for the floating print and paint projects, while the ocean picture only needs a few shades to come together. You don’t have to follow the steps exactly make it your own and let kids get creative.
Floating chalk prints with water and cardstock paper
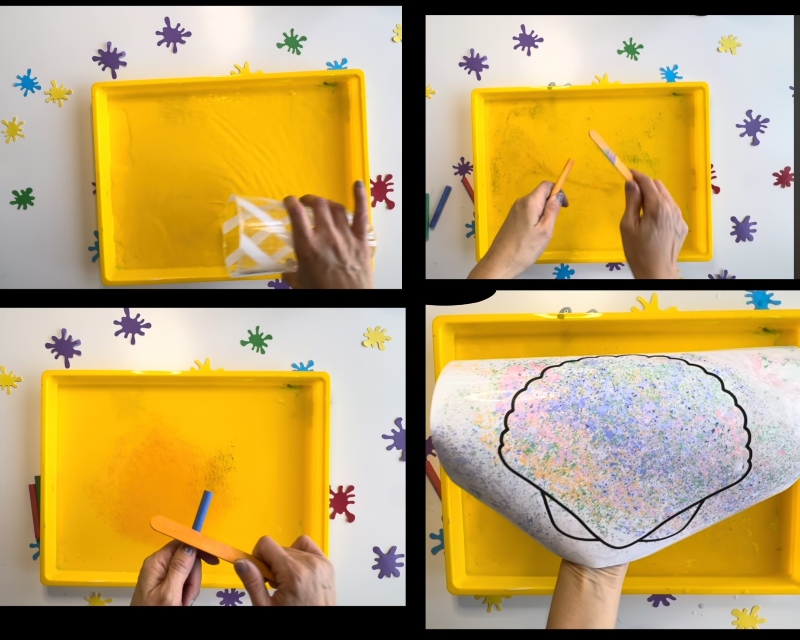
Floating chalk prints are one of the most surprising projects in the group because the setup looks so plain at first. You fill a tray with a small amount of water, shave chalk over the surface, and then let the paper pick up the color. The result looks so cool and kids will love making them!
A craft tray, casserole dish, or large Tupperware container all work here, as long as the bottom is wide enough for the paper to rest on the surface. You can get a dollar store casserole dish for messy crafts like this one. Cardstock is the better choice for this project because it handles the moisture better than thin paper.
1. Add water to a shallow tray. You only need enough to cover the bottom.
2. Shave a few chalk colors into the water. A popsicle stick works well for scraping chalk dust from the stick. Press down gently so the whole piece of chalk doesn’t fly into the water.
3. Lay the cardstock on top. Let it rest on the surface long enough to pick up the floating color, then lift it away.
4. Set the paper aside to dry. The pattern stays soft and blended, which is part of the look.
5. Repeat steps 2-4. For each new paper you will need more chalk floating on the surface so repeat the process to make multiple floating chalk prints.
Tip: Use cardstock instead of printer paper for this one. Kids will definitely want to press the paper down to the bottom and printer paper gets mushy if you are soaking it in water.
This project also works nicely with printable templates. For summer I used seashell templates to make colorful shells. Some are outlines and some already have designs. You can add extra designs to the seashell templates with sharpies before dipping in the water or washable markers after the chalk dries. If you are crafting at another time of year these star templates are perfect for any seasons!
DIY chalk paint that dries with a stained-glass look

The second project changes chalk even more. Instead of using it as a drawing tool, you crush it into small pieces, mix it with cornstarch and water, and turn it into a thick, colorful paint. This is fun to make for kids crushing up the chalk and for some reason painting chalk is even more fun than just drawing with chalk.
The chalk doesn’t need to become a fine powder, that might take forever and this mama doesn’t have forever. Small crushed pieces are enough to mix into paint. A spoon, a small hammer(doesn’t everyone have one?!), or even the bottom of a cup can be used to break the chalk apart. Putting the chalk in a bag first helps keep the pieces contained.
1. Crush several chalk colors in separate bags. Separate them into cups, or use an old cupcake tin to keep the colors organized.
2. Add cornstarch to each color. The video description calls for one spoonful, which helps thicken the mixture.
3. Pour in a little water and stir. Mix until the chalk looks blended together. It will look a little watery but dries like paint.
4. Optional: make shapes on the ground(or paper) with painters tape. Triangles, squares, and rectangles all work well. You can also make heart shapes or use the tape to make a name. Get creative! If you don’t have the tape no worries just paint your own shapes!
5. Paint inside the taped sections. Use one color per shape, or two.
6. Let it dry, then peel off the tape. Luckily the paint doesn’t take long to dry. The lines separate the sections and create a stained-glass look.
At first, the paint can look pale. That can be misleading, because the color becomes stronger after it dries.
Don’t judge the finished color while the paint is still wet. Chalk paint starts out light, then looks brighter once it dries.
This project has a nice mix of structure and freedom. The taped shapes give kids a guide, but the color choices and patterns are still open-ended. Some pages look bold and geometric, while others come out softer and more playful. Either way, peeling off the tape at the end is part of the fun.

Under the sea chalk art

The under the sea project uses blending instead of water or paint. You only need a few materials making this an easy peasy craft and bringing the chalk indoors if you live on the surface of the sun like I do. The center starts with light color, then the darker shades move outward so the page looks like if you are at the bottom of the ocean looking up at the sea creatures with the sun above them.
White or yellow both work for the center. After that, add blue around it in widening circles. If you have a lighter blue, it fits the ocean theme nicely, but dark blue still works if that’s what you have on hand. That is all I had at the time.
- Start in the middle with white or yellow chalk. Draw in circles. Making bigger circles as you move out.
- Add more color as you move outward. Blue around the edges helps create the water effect.
- Smudge the chalk outward. Use your fingers to smudge the chalk, or a paper towel works. too
- Go back in with more yellow or white. A second layer adds highlights after blending.
The dark background does a lot of the work here. It makes the center glow, and the smudged edges look soft instead of harsh. Because the colors blend together, this project feels a little more like drawing and a little more like painting at the same time.
To finish the page, add ocean animal silhouettes on top. You can draw a simple fish, turtles, or other sea shapes on white paper with a black marker, cut them out, and glue them over the chalk background with white school glue.
Bonus chalk activities for outside play
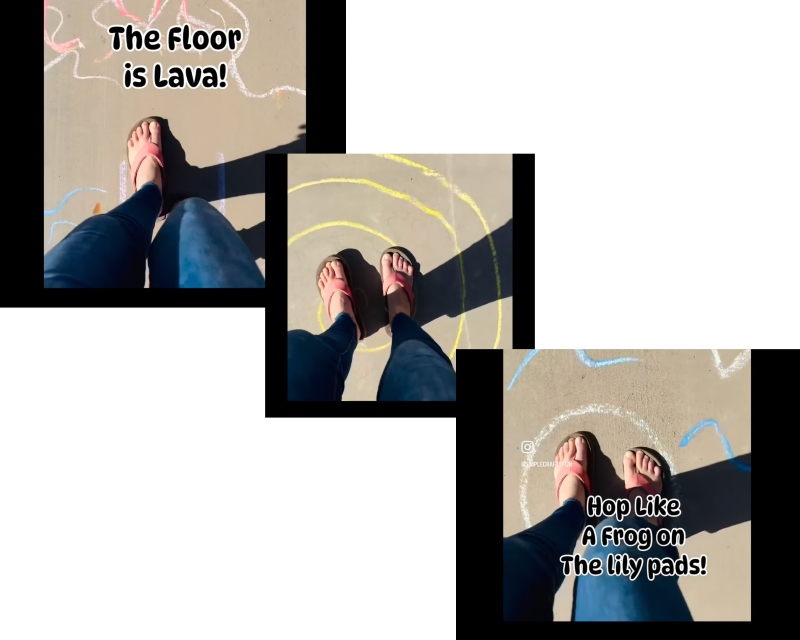
A fun activity to do with kids outside is to make a chalk obstacle course. Kids can help to draw the different obstacles.
These are the ones I used but I will give a few other ideas:
- Pop the bubbles
- Walk the plank
- The floor is lava
- Spin around
- Hop like a frog on the lily pads
- Other ideas: Hop like a bunny
- Drive on the racetrack(draw a road)
- Squish the bugs
- Climb the tree
This is such a fun and easy activity for little and big kids. Younger kids can follow simple actions like hopping or spinning, while older kids can help invent the course and add new directions. Because the rules are written or drawn right on the ground, the game feels a little like a homemade board game stretched across the sidewalk.
Chalk Tip
Quick tip: dip chalk in water before drawing outside if you want a darker, paint-like line on the driveway or sidewalk.
This is an easier way to make a paint effect without mixing up paint. It might dry out the chalk a bit so its the perfect way to use older chalk.
Final thoughts
Chalk is one of the easiest art supplies to keep around because it changes so easily. You can use it inside on paper or outside. Chalk is a budget friendly material to use for lots of fun with the kiddos.
If you want the simplest place to start, pick the project that matches your space. Use the table for paper art, or head outside and turn the sidewalk into the activity.

About Valerie Jackson
Hi I'm Val! I love making simple crafts with my kids using free printable templates. Come craft with us!
- Web |
- More Posts(503)